Ready to transform your vehicle into the ultimate overlanding machine? Your success and safety in the backcountry depend on having the right must-have overland gear for every situation.
Whether you’re planning weekend adventures or extended expeditions, proper equipment selection makes the difference between an epic journey and a frustrating experience.
This comprehensive guide walks you through 12 essential pieces of overlanding equipment, starting with the crucial truck topper that protects your gear and creates valuable storage space.
You’ll discover everything from recovery gear and portable power stations to navigation tools and communication devices. Each item has been carefully selected based on real-world testing and proven performance in challenging off-road conditions.
Truck Topper
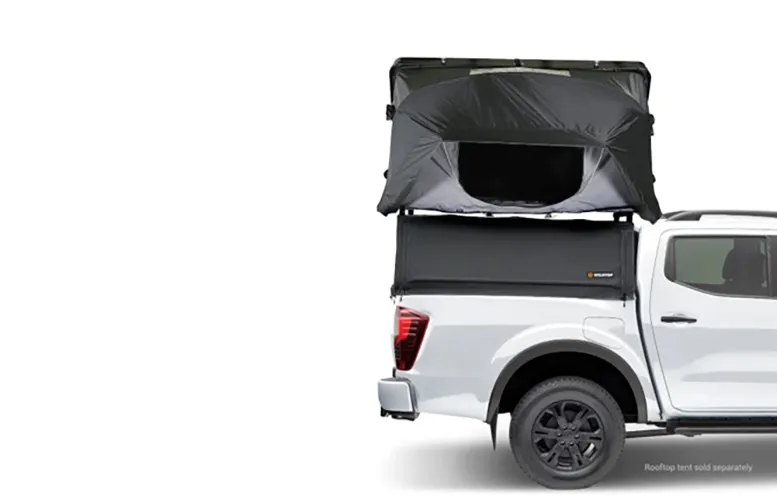
Image Source: Wild-Top.com
A truck topper, like the one in the image above from Wild Top transforms your pickup into the ultimate overlanding command center. This unique piece of gear creates a secure, weatherproof haven for your equipment while adding versatility to your vehicle.
Truck Topper Benefits
Your overlanding adventures demand protection and functionality. A quality truck topper delivers multiple game-changing advantages:
- Enhanced Security: Lockable storage keeps your valuable gear safe
- Weather Protection: Shield equipment from rain, snow, and UV damage
- Improved Aerodynamics: Better fuel efficiency on long journeys
- Sleeping Platform: Transform your truck bed into a cozy shelter
- Versatile Storage: Organize gear with customizable storage solutions
Truck Topper Types
Navigate the market with confidence by understanding your options. Here’s a comparison of popular truck topper styles:
| Type | Best For | Key Features |
| Hard Shell | Maximum Security | Durable, lockable, supports roof racks |
| Soft Top | Flexibility | Lightweight, removable, cost-effective |
| Pop-up | Camping | Integrated sleeping space, ventilation |
Truck Topper Installation
Installing your truck topper requires careful attention to detail. Start by gathering 4-6 people to help lift the 150-180 pound unit. Before installation, inspect the foam tape seal along the bottom rails – this creates a weatherproof barrier between the topper and your truck bed.
Position the topper carefully, ensuring alignment with your truck’s cab and tailgate. Once aligned, secure the clamps (typically four for short beds, six for long beds) and connect any electrical components like brake lights or interior lighting.
Pro Tips for Installation:
- Never hang your topper from ceiling storage
- Store on sawhorses when removed
- Check clamp tightness periodically
- Test all electrical connections before finalizing installation
Remember to maintain proper seal integrity and clamp tension for optimal performance. Your truck topper serves as the foundation for many other overlanding modifications, so taking time for proper installation pays dividends down the road.
Recovery Gear Kit
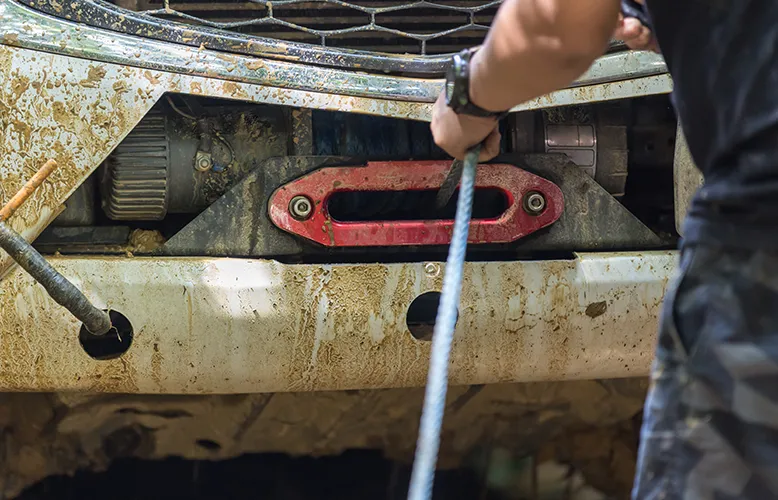
When venturing off-road, your recovery gear kit becomes your lifeline in challenging situations. This essential collection of tools and equipment can mean the difference between a minor delay and being stranded in remote terrain.
Essential Recovery Items
Your basic recovery kit should include gear rated for 1.5x your vehicle’s weight. Here are the must-have components:
- Kinetic Recovery Rope (rated 4x vehicle weight)
- Soft Shackles (2-4 pieces, rated for vehicle weight)
- Tree Saver Strap (minimum 8ft length)
- Recovery Boards (1 pair)
- Heavy-duty Shovel
- Gloves and Line Dampener
How to Use Recovery Gear
Safety is paramount when performing any recovery operation. Never use recovery points not rated for your vehicle’s weight. For kinetic rope recoveries:
- Inspect all equipment before use
- Maintain 1.5x vehicle length distance
- Clear the recovery path of obstacles
- Use line dampeners on all cable/rope connections
- Keep bystanders at least 1.5x rope length away
Best Recovery Gear Brands
| Brand | Specialty | Price Range |
| Factor 55 | Winch Equipment | Premium |
| ARB | Recovery Straps | Mid-High |
| WARN | Winches | Premium |
| MaxTrax | Recovery Boards | Mid-Range |
For winch-based recoveries, invest in synthetic rope over steel cable — it’s lighter, safer, and easier to handle. Important: Always inspect your recovery gear before each trip and replace any damaged equipment immediately.
Always practice recovery techniques in controlled environments before attempting them in remote locations. Your recovery kit should be easily accessible — store it where you can reach it without unpacking your entire vehicle.
Portable Power Station
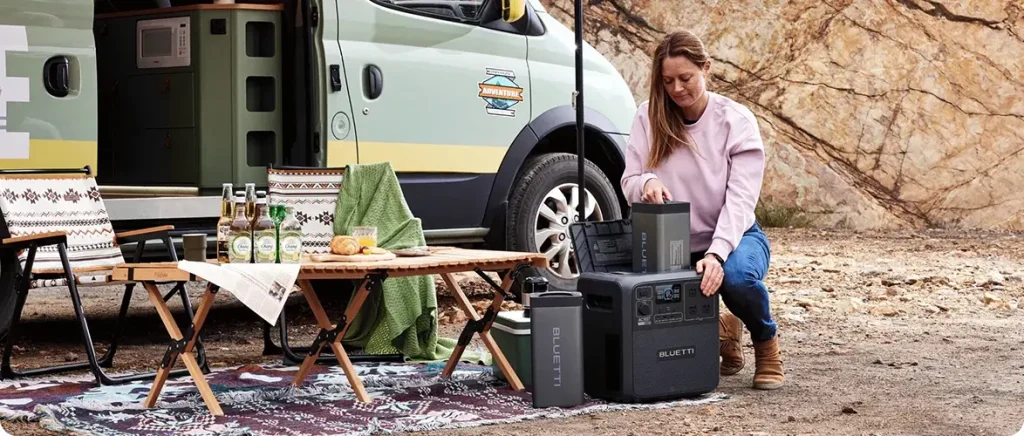
Power is the lifeblood of modern overlanding adventures. A reliable portable power station ensures your essential devices stay charged and running, whether you’re deep in the backcountry or setting up camp for an extended stay.
Power Station Capacity
Understanding your power needs is crucial before investing in a portable power station. Calculate your requirements by listing all devices you’ll need to power: laptops (45W), phones (18W), camera batteries (15W), and any future additions like a portable fridge (40-60W). For overlanding, aim for a minimum capacity of 500 watt-hours to maintain essential devices for several days.
Power Station Features
Your overlanding power station must include these game-changing features:
- Pure sine wave inverter for clean, stable power
- Regulated 12V output for reliable fridge operation
- Pass-through charging capability
- MPPT solar controller for efficient charging
- Multiple charging methods (solar, AC, DC)
Top Portable Power Stations
Compare these leading models to find your perfect power companion:
| Model | Capacity | Max Output | Solar Input | Weight |
| EcoFlow Delta 2 | 1024Wh | 1800W | 500W | 27.6 lbs |
| Bluetti AC180 | 1152Wh | 1800W | 500W | 29.3 lbs |
| Anker 757 | 1229Wh | 1500W | 300W | 24.5 lbs |
For maximum versatility, consider units with USB-C PD ports supporting up to 100W output—perfect for charging laptops and camera gear. Remember, it’s better to have more power capacity than you think you’ll need, especially when overlanding in remote areas where charging opportunities might be limited.
Pro Tip: When selecting your power station, factor in about 15% extra capacity for battery degradation over time and unexpected power needs during your adventures.
Off-Road Tires
Your tires are the critical connection between your overlanding rig and the challenging terrain ahead. Selecting and maintaining the right off-road tires can make the difference between conquering that remote mountain pass and turning back disappointed.
Choosing the Right Off-Road Tires
Your overlanding adventures demand tires that excel both on and off the pavement. Consider these crucial factors when selecting your perfect set:
- Load Rating: Must exceed your fully loaded vehicle weight
- Tread Pattern: All-terrain for versatility, mud-terrain for extreme conditions
- Sidewall Strength: Look for reinforced construction with 3-ply minimum
Off-Road Tire Maintenance
Proper maintenance ensures your tires perform when you need them most. Implement these essential practices:
- Monitor pressure regularly – reduce PSI for off-road traction
- Rotate tires every 5,000 miles using the clockwise five-tire pattern
- Remove debris daily during adventures
- Check alignment after challenging terrain
- Inspect sidewalls for damage after rocky sections
Popular Off-Road Tire Brands
Choose from these proven performers for your overlanding setup:
| Brand & Model | Best For | Key Features |
| BFGoodrich KO2 | All-Around | 50,000-mile warranty, 3-Peak rated |
| Goodyear Duratrac | Mixed Terrain | Self-cleaning shoulder blocks |
| Toyo Open Country AT3 | Long-Distance | 65,000-mile warranty, wet performance |
| Falken Wildpeak | Value | All-weather capability, durability |
For maximum versatility, the BFGoodrich KO2 stands out with its CoreGard technology and proven durability across varied terrains. If your journeys frequently include mud and snow, consider the Goodyear Duratrac with its aggressive shoulder blocks and winter certification.
Don’t forget to factor in your specific needs — a weekend warrior might prioritize different features than someone planning extended backcountry expeditions. Your tire choice should reflect both your vehicle’s capabilities and your adventure ambitions.
Rooftop Tent
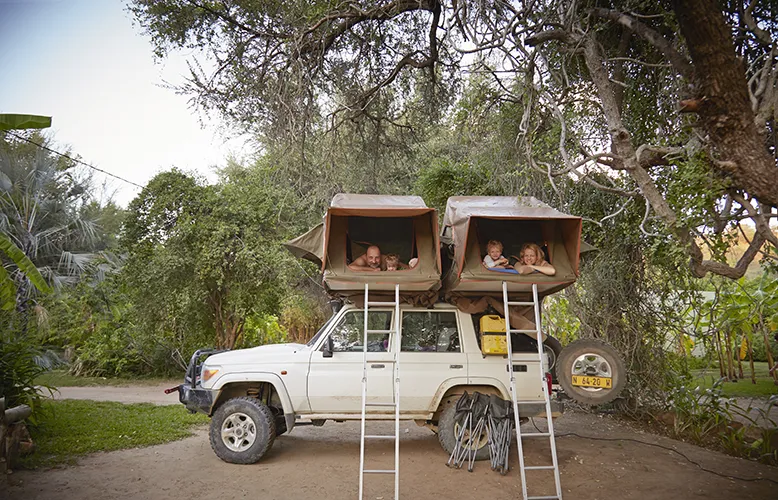
Elevate your overlanding experience — literally — with a rooftop tent that transforms your vehicle into the ultimate mobile basecamp. This game-changing piece of must have overland gear delivers unmatched comfort and convenience for your adventures.
Rooftop Tent Advantages
Experience superior camping comfort with these game-changing benefits:
- Enhanced Safety: Stay elevated above ground-level hazards
- Superior Comfort: High-density memory foam mattresses included
- Quick Setup: Deploy your shelter in minutes
- All-Season Protection: Robust materials handle any weather
- Built-in Views: Enjoy elevated vantage points at camp
Setting Up a Rooftop Tent
Transform your campsite in minutes with these straightforward steps:
- Park on level ground and engage parking brake
- Remove protective cover
- Release securing straps
- Extend ladder to proper angle
- Unfold tent completely
- Secure window awnings and door panels
Pro Tip: Survey your parking spot carefully — your vehicle becomes your tent’s foundation, so proper positioning is crucial for comfort.
Best Rooftop Tent Options
Choose the perfect shelter for your overlanding adventures:
| Model | Best For | Key Features | Capacity |
| iKamper Skycamp 3.0 | Small Vehicles | Tool-free install, quick setup | 2-3 Person |
| Thule Tepui Foothill | Value | Low profile, durable fabric | 2 Person |
| Roofnest Sparrow EYE | Comfort | Spacious interior, hard shell | 2-3 Person |
| Yakima SkyRise HD | Families | Extra headroom, larger floor plan | 3+ Person |
For year-round adventures, consider hardshell options like the Roofnest Sparrow EYE — they offer superior durability and faster setup times. If you’re new to overlanding, the Thule Tepui Foothill provides excellent value while maintaining essential features for comfortable backcountry camping.
Remember to verify your vehicle’s dynamic roof load rating before installation — most vehicles require a rating of at least 165 pounds to safely support a rooftop tent during travel.
Navigation Tools
Successful navigation in remote terrain demands reliable tools and backup systems. Your overlanding adventures require a strategic combination of modern technology and traditional navigation methods to ensure you always find your way.
GPS Devices for Overlanding
Transform your navigation capabilities with purpose-built GPS devices designed for off-road exploration. Modern units combine robust features with reliable performance:
| Device | Key Features | Price Range |
| Garmin Tread XL | 10-inch display, inReach technology | USD 1,499 |
| Garmin Montana 700i | Military-grade durability, satellite messaging | USD 699 |
| Garmin Overlander | 64GB storage, pitch/roll display | USD 699 |
Paper Maps and Compasses
Never underestimate the importance of analog navigation tools. Your must have overland gear should include reliable paper maps and a quality compass like the Suunto MC-2 (USD 70). These tools offer:
- Weather-independent operation
- No battery requirements
- Enhanced terrain understanding
- Reliable backup navigation
- Improved route-planning skills
Navigation Apps for Off-Road Use
Enhance your navigation arsenal with powerful smartphone applications. Leading options include:
Gaia GPS — Premium subscription provides extensive basemap options, offline capabilities, and route planning tools. Perfect for detailed trip preparation and execution.
OnX Offroad — Offers comprehensive trail information, property boundaries, and offline mapping capabilities. The app includes over 985 million acres of public land data and 54,000 campsite locations.
Pro Tip: Download offline maps before your journey — cellular service is unreliable in remote areas. Consider using multiple navigation methods simultaneously for enhanced safety and confidence in challenging terrain.
Regularly update your GPS devices and apps, and always carry spare batteries or portable power for electronic navigation tools. Your navigation system should be as reliable as your vehicle itself.
Portable Fridge/Cooler
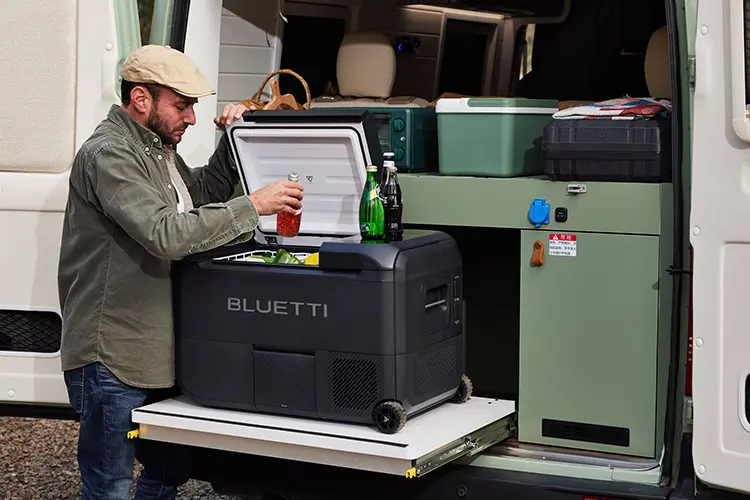
Say goodbye to melted ice and soggy sandwiches — revolutionize your overlanding experience with the ultimate food storage solution. A quality portable fridge or high-performance cooler is essential must have overland gear that transforms how you handle provisions on the trail.
Fridge vs Cooler Comparison
Make an informed choice based on your specific needs:
| Feature | Portable Fridge | Premium Cooler |
| Temperature Control | Precise (-7°F to 50°F) | Ice-dependent |
| Power Needs | 0.7-2.3 amps/hour | None |
| Initial Cost | $500-$2000 | $200-$500 |
| Weight | 25-45 lbs | 15-30 lbs |
| Capacity | 25-65L | 35-70L |
Powering Your Portable Fridge
Your fridge’s performance depends on proper power management. For reliable operation, ensure:
- Dedicated 12V connection with minimum 10-gage wiring
- Low-voltage cutoff protection
- Solar panel backup for extended stays
- Power consumption monitoring system
Pro Tip: Size your battery system for 55.2 amp-hours per day of fridge operation — this ensures reliable performance even in challenging conditions.
Top Overland Fridge Brands
Transform your food storage capabilities with these proven performers:
- Dometic CFX3 — Award-winning efficiency with Bluetooth control
- ARB Zero — Military-grade durability meets precision cooling
- Engel — Legendary reliability with minimal power draw
- National Luna — Premium build quality with dual-zone options
Choose your fridge size based on crew size: 35L for solo travelers, 40-45L for couples, and 50-65L for family adventures. Remember — smaller units consume less power while maintaining optimal efficiency.
For maximum versatility, consider dual-zone models that offer separate fridge and freezer compartments. These units let you maintain fresh provisions while keeping ice cream frozen — because who says overlanding can’t include premium comfort?
First Aid Kit
In the remote wilderness, your first aid kit becomes your mobile emergency room. As essential must have overland gear, a properly equipped medical kit — combined with the knowledge to use it — can mean the difference between a minor setback and a trip-ending emergency.
Essential First Aid Items
Transform your medical preparedness with a comprehensive kit designed for backcountry emergencies. Your foundation should include:
| Category | Essential Components |
| Wound Care | Gauze, bandages, antiseptic wipes |
| Medications | NSAIDs, antihistamines, prescription meds |
| Tools | Scissors, tweezers, digital thermometer |
| Emergency | QuikClot, tourniquets, emergency blanket |
Pro Tip: Organize supplies in clear, waterproof containers using the Easy Care™ organization system for quick access during emergencies.
First Aid Training for Overlanding
Elevate your wilderness medical skills through specialized training. Quality courses offer:
- Hands-on practice with real scenarios
- Wilderness-specific protocols
- Advanced bleeding control techniques
- Remote patient assessment skills
- Long-term care strategies
The National Outdoor Leadership School (NOLS) and Wilderness Medical Associates offer comprehensive courses tailored to overlanding challenges. Consider their Wilderness First Aid certification — a 16-hour intensive covering everything from altitude sickness to fracture management.
Specialized Overland Medical Kits
Your medical preparation should include three distinct kits for comprehensive coverage:
- Quick-Access Kit — For minor injuries, stored in your glove box
- Base Camp Kit — Your mobile medicine cabinet for extended stays
- Trauma Kit — ABC (Airway, Breathing, Circulation) focused equipment for serious emergencies
The Overland Med Kit stands out with its 70+ customizable items, including prescription-strength medications like mupirocin for skin infections and ciprofloxacin for severe ailments. Remember — your kit is only as good as your ability to use it effectively.
Water Filtration System
Clean water is your lifeline in the backcountry — and your overlanding adventure depends on a reliable filtration system. Transform your water management capabilities with the right filtration solution that matches your expedition needs.
Importance of Clean Water
Your daily water requirements during overlanding adventures can reach 3-5 gallons per person. This includes drinking water, cooking needs, and basic hygiene — making a dependable filtration system one of your most critical must have overland gear investments.
Types of Water Filters
Choose the perfect filtration system for your adventures with these field-tested options:
| Filter Type | Capacity | Flow Rate | Best For |
| Lifesaver Jerrycan | 20,000L | 2.5L/min | Extended trips |
| Gravity Systems | 1,500L | 1L/min | Group camps |
| Hand Pump | 2,000L | 1L/min | Emergency backup |
| UV Purifiers | Unlimited | 1L/90sec | Clear water sources |
The Lifesaver Jerrycan stands out with its impressive 20,000-liter capacity and chemical filtration capabilities — perfect for extended overlanding expeditions. For maximum versatility, consider adding activated carbon filters to improve taste and remove chemicals from municipal water sources.
Using Water Filters in the Backcountry
Master your water filtration system with these field-proven techniques:
- Pre-filter murky water through a bandana to extend filter life
- Install quick-connect fittings for rapid container filling
- Maintain separate dirty and clean water containers
- Keep your filter from freezing in cold weather
- Clean and backflush regularly to maintain flow rates
Pro Tip: Size your system for 25% more capacity than your estimated daily needs — unexpected situations and challenging water sources can increase your consumption significantly.
Your filtration system should include both a primary solution and an emergency backup. The combination of a high-capacity unit like the Lifesaver Jerrycan with a compact hand pump provides redundancy for critical water management needs.
Camping Stove
Transform your outdoor culinary experience with a premium camping stove — the cornerstone of memorable meals in the wilderness. A reliable stove system ensures hot meals and morning coffee remain constants in your overlanding adventure.
Choosing an Overland Stove
Your perfect overlanding stove combines power with precision. Look for these game-changing features:
- Dual-burner configuration with 10,000+ BTU output
- Precise simmer control for temperature management
- Integrated windscreens for consistent performance
- Sturdy construction with stainless steel components
- Quick-clean drip tray and removable grates
Fuel Types for Camping Stoves
Select the optimal fuel source for your adventures with this comprehensive comparison:
| Fuel Type | Advantages | Best For | Temperature Range |
| Propane | Widely available, consistent performance | All-season use | -44°F to 120°F |
| Butane | Compact, lightweight | Warm weather | 32°F to 120°F |
| Dual Fuel | Versatile, high efficiency | Extended trips | -20°F to 120°F |
For maximum reliability, propane stands out as the champion of overlanding fuels. A single 16.4-oz propane cylinder delivers approximately one hour of cooking time at high output — perfect for weekend adventures.
Best Stoves for Overlanding
Transform your camp kitchen with these field-tested performers:
The Camp Chef Everest 2X dominates with dual 20,000 BTU burners and matchless ignition. Its three-sided windscreen and precise flame control make it the ultimate choice for serious overlanders.
For compact efficiency, the Primus Kinjia offers 14,000 BTU output while maintaining excellent simmer control. Its integrated fuel line prevents tippy setups — crucial when cooking on uneven terrain.
The iKamper Disco Series revolutionizes overlanding cuisine with its innovative design. Featuring a 10,000 BTU burner and integrated griddle surface, it transforms from stove to grill in seconds.
Remember to position your stove on a stable surface away from your tent or vehicle. The integrated windscreens on modern stoves provide essential protection, but proper placement remains crucial for safety and performance.
Communication Devices
Stay connected beyond the reach of cellular networks with reliable communication devices — your lifeline to civilization and safety during remote adventures. Modern overlanding demands a comprehensive communication strategy combining multiple technologies for redundant coverage.
Satellite Messengers
Transform your communication capabilities with two-way satellite messaging. These powerful devices offer global coverage through advanced satellite networks:
| Device | Network | Subscription | Key Features |
| Garmin inReach | Iridium | $15-65/month | Global coverage, weather updates |
| SPOT X | Globalstar | $12-40/month | Built-in keyboard, tracking |
| ZOLEO | Iridium | $20-50/month | Smartphone integration |
Your satellite messenger serves as both a communication tool and safety device — offering SOS functionality with direct connection to emergency response centers like GEOS International.
Two-Way Radios
Maintain reliable group communication with professional-grade two-way radios. Your ideal setup includes:
- UHF/VHF capability for maximum range
- 5-50 watts power output options
- Weather-sealed construction
- Privacy codes for clear transmission
- NOAA weather alerts integration
For overlanding applications, the Midland MXT575 mobile radio delivers exceptional performance with its 50-watt output and vehicle-mounted design. Remember — GMRS frequencies require an FCC license, but provide superior range and clarity compared to license-free options.
Emergency Beacons for Overlanding
Your emergency communication strategy demands redundancy. Personal Locator Beacons (PLBs) offer:
- No subscription requirements
- Global coverage through Cospas-Sarsat
- 5-year battery life
- Direct connection to search and rescue
- Military-grade durability
The ACR ResQLink View stands out with its digital display and integrated GPS. Unlike satellite messengers, PLBs focus solely on emergency response — providing a dedicated backup for critical situations.
Your communication setup should include at least two independent systems. While satellite messengers offer versatility, combining them with two-way radios and a PLB ensures you’re prepared for any scenario — from coordinating with your convoy to summoning emergency assistance.
Lighting Solutions
Illuminate your path to adventure with professional-grade lighting solutions — because darkness should never limit your exploration. Your overlanding journey demands a comprehensive lighting strategy that combines personal, camp, and vehicle-mounted solutions.
Headlamps for Overlanding
Transform your night navigation capabilities with a premium headlamp. The latest models deliver exceptional performance with hands-free operation and multiple lighting modes.
| Model | Lumens | Battery Life | Best Feature |
| Black Diamond Spot 400-R | 400 | 200 hours | PowerTap Technology |
| Petzl Actik CORE | 450 | 130 hours | Rechargeable Core Battery |
| Nitecore NU25 UL | 360 | 160 hours | Ultralight Design |
Your headlamp selection should prioritize durability and versatility — look for units offering both spot and flood beam patterns for maximum utility around camp.
Camp Lanterns
Revolutionize your campsite illumination with modern LED lanterns that combine powerful output with innovative features. The latest models transform any site into a well-lit basecamp:
The BioLite AlpenGlow 500 stands out with its:
- 500 lumens of adjustable white and color lighting
- 200-hour runtime on low setting
- USB-C rechargeable battery system
- Waterproof construction for all-weather reliability
For extended stays, the Goal Zero Lighthouse 600 delivers unmatched versatility with its integrated hand crank for emergency power generation and USB output for device charging.
Vehicle-Mounted Lighting
Elevate your overlanding capabilities with strategic vehicle lighting placement. Your comprehensive setup should include:
Forward Lighting:
- ARB NACHO TM5 Combo lights with 23,000 lumens per pair
- Integrated fog and driving patterns
- Pressure equalization vents for altitude changes
Camp Area Illumination: Transform your site with the Revel Gear Trail Hound system — featuring 30 feet of LED illumination that draws minimal power while providing perfect ambient lighting for camp setup and socializing.
Rock Lights: Install RIGID Industries rock lights in strategic locations:
- Front wheel wells for suspension inspection
- Mid-vehicle for safe passenger entry/exit
- Rear quarters for 360-degree ground illumination
Your vehicle lighting strategy should balance power consumption with practical utility. Modern LED systems deliver exceptional output while drawing minimal power — perfect for extended adventures where energy management is crucial.
Remember to include redundant lighting options in your must have overland gear collection. The combination of personal headlamps, versatile camp lanterns, and vehicle-mounted solutions ensures you’re prepared for any lighting challenge your adventure presents.
Conclusion
Successful overlanding demands thoughtful preparation and reliable equipment. Each piece of gear discussed serves as a crucial component in a comprehensive adventure system, from the foundational truck topper to advanced communication devices. Smart equipment choices create layers of safety, comfort, and capability that transform challenging backcountry travel into memorable experiences.
Quality overlanding gear represents more than individual tools – these items work together as an integrated system supporting your journey. Reliable power management enables navigation and communication tools, while proper storage solutions protect vital equipment from harsh conditions. Armed with these twelve essential pieces of gear, your vehicle stands ready for countless miles of exploration and discovery through remote landscapes.


